How to remove acne in Photoshop. How to remove acne on the face in a photo in Photoshop in different ways How to paint over acne in Photoshop
Greetings! Many people, particularly teenagers, now have a small problem that has a complex solution. This is, you guessed it, acne. I won’t advertise to you all sorts of remedies for skin problems, I won’t lie to you that “Klerosil” helps with this, etc. But know that all this will pass sooner or later, but “pleasant” memories, of course, will remain in your photos. And that’s why I suggest you remove this little problem from your wonderful memories. As I said, this problem has a very complex solution, but not in our case, since we have Photoshop. Our problem will be helped by a healing tool, which, by the way, is approved by the Russian Ministry of Health, the “Healing Brush,” and all the items that are located with it in one tab.
These items are:
- The “Spot Healing Brush” is the same as the “Healing Brush”, only it is more automated;
- “Patch”, this item will help us heal large areas of skin;
- “Red Eyes”, this item is unlikely to help you get rid of acne, but we will consider it, as they say, “for company”, since it is in the same tab as the “Repairing Brush”. Okay, don't worry, I was joking. We will look at this tool in a separate lesson dedicated to red eyes. So let's get started, I guess.

Let's move on to the very interesting and tempting Patch tool. The action of this tool is as follows. You select the area and move it to the place you need. The terrain is selected in the same way as with the Lasso tool. And then we move the selection to the area that should be replaced. But this will increase depending on the settings of this tool. We can move the allocated place, or transfer it to it. To change this setting, you need to check the box, whichever you think is more convenient, opposite “Source” or opposite “Destination”. We also see the “Transparent” setting here. If the Destination setting is enabled, this setting determines whether the transfer layer is transparent or not.

As great grandfather Lenin said, “Study, study, and study again.” But we’ve already finished school today, and that’s why I give you permission to mess around. Goodbye.
Good time everyone! We continue to eliminate defects in the photo using Photoshop. Today the topic of conversation will be acne. A clean and smooth face always looks aesthetically pleasing, especially if it is a portrait. We have to somehow solve the problem. Retouching will help us again.
Photoshop is a wonderful program and in it you can remove everything from the face that interferes with normal perception. How to retouch a face if it has many defects will be discussed below.
Removing Facial Acne from a Photo in Photoshop Using the Healing Brush Tool
So, upload the photo and duplicate the layer. Next, we'll need the Spot Healing Brush tool.

Let's choose it. After this, press the key ALT and select a clean area of skin as a sample, click the mouse - the choice is remembered. Now, if necessary, set the desired brush size. It is desirable that it be approximately equal in diameter to the object being corrected.

Now let's start removing acne. If you click on a pimple with the tool, you will see a blackhead appear. It's okay, after you remove the tool (release the mouse button), the blackhead will disappear, just like the pimple itself.

In addition, if the pimple spot is too large, you can paint it over with a brush.

This way we cover all the pimples. As a result, the face has cleared up somewhat and looks much better.


Make the size of the brush large, but if your default settings are the same as in the picture, then leave them.

We begin to work on the areas with a brush. It should look something like this:

Do you see that your skin color has become uneven? Let's fix it. Next we need the Surface Blur filter. In the top menu we find “Filters” and select as in the photo:

In the window that opens, set the settings as in the figure. Although yours may be slightly different, it all depends on the quality of the image being processed. Now, pressing the button again ALT, click on the mask icon in the layers palette, thereby creating a black mask on the working layer.


Using a brush, we paint over the areas with defects; we will see a white spot appear on the mask.

Again, go to the very first working layer (background copy), move it to the top and make a copy of it again.

I ended up with the names of the layers as in the picture below. Activate the “background copy” layer, open the “Filter” menu and apply the “Color Contrast” filter to it. Turn off visibility for the top layer.

Don't be alarmed, the image has become gray and contrasting. In the window that appears, move the slider until details appear in the picture.

Now turn on the top layer and apply the same filter to it, but with slightly softer settings. It should look something like this:

For each of these two layers, you need to change the blending mode from normal to “overlay”. To do this, select the desired mode from the list in the checkbox:

In the course of all manipulations we will get the result.

The image has acquired the necessary conditions. Now you can save it.
How to remove acne on the face in Photoshop online
If you love working with Photoshop online, then this chapter is for you. Open the page in the browser and upload the photo. Next we find the spot correction tool. In the online version, everything is simpler and more intuitive. Suitable when you need to quickly edit a photo.

Spot correction is designed for processing small objects and is similar to the spot healing brush from classic Photoshop. That's why we act in the same way. Having chosen the desired size, we guide it over the pimples. They are highlighted and then removed. Another tool that you can use here is the “Stamp”.

Having selected it, press the button CTRL and click on a clean area of skin. The instrument took a sample. It will be in the form of a target. Now click on the pimple - a circle with a plus sign, and a target icon will appear next to it. Thus, defective areas are replaced with clean ones.

Of course, you will need to practice to master these techniques well. It may not turn out quite right the first time, but I am sure that if you slowly follow this small manual, everything will work out. You will also need to experiment with the size of the brushes and stiffness... That's probably all. Good luck in mastering the program!
The origins of Adobe Photoshop go back to 1988, but the birth of the official version dates back to February 1990. Since then, the Photoshop program has become the most popular raster graphics editor among photographers, artists, designers and a huge army of ordinary users.
Arsenal of proofreading tools
An editor can do the most unimaginable things with images, and in many different ways. To correct sharpness alone, there are 7 (or maybe more) methods, not to mention special plug-ins, each of which deserves special attention with a separate discussion. The developers have even provided retouching tools to solve such a popular question of how to remove acne in Photoshop.
Tools whose direct responsibility is to increase the clarity of photographs are collected in the “Sharpening” group in the “Filter” menu and are easy to use, just like the standard “Sharpening” tool (in the “Blur” group) on the toolbar. However, they all have a “character flaw” that manifests itself in destructiveness, so professionals often use indirect, gentle sharpening methods, such as “Color Contrast” / High Pass (Filter> Other / Filter> Other) or color channels where correction is subjected to either a duplicate layer (in the first case), or an alpha channel (in the second case).
Non-destructive correction methods
Numerous and sometimes overly lengthy Photoshop lessons are devoted to these methods, but the essence of such tricks can be outlined briefly.

Retouching tools
Tools with retouching functions are used not for drawing, but for eliminating various defects and artifacts in photographs. If you are interested not only in how to remove acne in Photoshop, then keep in mind that with the help of these tools you can also remove (or “transplant”) a mole on the face, smooth out or completely remove wrinkles, remove an ugly scar or add a masculine one , redistribute fairly “thickets or bushes” of hair on the head, remove “baggy fatigue” under the eyes and much more.

You can “putty” scratches, cracks or abrasions on a photo, soften harsh shadows from a flash, remove unnecessary objects or entire fragments, glue an old photo and even restore a torn corner. On the toolbar, retouching tools are combined into two groups under the buttons with the patch and stamp icon. The "Patch" group also contains healing brushes, the "Red Eye" tool, and the "Content Aware Move" function. The “Stamp” tandem consists of the stamp itself and its patterned version.
Patches and stamps
The Stamp tool, unlike a brush, draws not with color, but with a fragment of our own image. This fragment will become a sample for cloning if you click on it with the Alt key pressed, after which you go to the desired location and use the left button to draw with the selected sample until you need to change it by clicking again in a new place with the Alt key pressed. The sample size (aka brush size) depends on the size of the area being cloned.
The “pattern stamp” can rather be classified as a drawing tool rather than a retouching tool, because it is essentially a brush, but it paints over textures rather than paints.
The “Patch Tool” can also clone an image, but not with individual strokes, but with selected areas, which are dragged to the desired place, where they take root, growing like native ones. This is exactly what will happen if the “Destination” option is selected in the settings panel at the top. If you check the “Source” circle, everything will be the other way around. Select the desired (cloned) area and drag the outline to the place that will become a sample for the selected area.
Healing brushes
"Cosmetic" tools are represented by a spot healing brush tool and a simple healing brush tool. These products are ideal for users who are concerned about how to remove acne in Photoshop.

The principle of operation of a healing brush is generally the same as that of a stamp, but here cloning occurs with the adjustment of color and texture to new conditions. The stroke parameters of this brush are customizable by the user and, in addition to size, include hardness, movement intervals, angle, shape and pen pressure control.
The spot restoration brush does not require any effort from the user at all, except for left-clicking on the unfortunate pimple, spot or unflirty mole, with the preliminary selection, of course, of the appropriate brush size. This “cosmetic tool” has two operating modes, which can be switched in the settings panel at the top. Typically, defect removal is performed “Content-aware,” and the “Texture Creation” mode, in which a certain average texture is created in the outline of the print, is used less frequently.

When the Content Aware option is selected, you can change the blend mode in the settings panel (Mode), choosing options that lighten dark spots and darken options for light spots on a dark background.
Cosmetic brushes
Having figured out how to remove acne in Photoshop using retouching tools, you can seemingly calm down on this, but there is another simple and effective way to “create a virtual mess” on your face.
Nowadays, for almost any task related to image processing in Photoshop, craftsmen create and distribute special brushes completely free of charge, with which you can even paint a landscape with one stroke. In general, you can simply download and install cosmetic brushes for Photoshop on your computer in the folder with the program.

Sets of such tools usually include options with different textures, so choosing something suitable is not difficult. Brushes are suitable not only for retouching, but also for completely restoring areas of the skin “damaged” due to diligent editing.
Today, dear reader, we will talk about an important matter and skill. Let's discuss how to properly use modern graphic editors to change and improve photographs. We will talk about a multifunctional product from Adobe. Photoshop is your assistant in image editing. Moreover, this program is a tool that can completely transform any image. Let's look at one specific problem. So:
How to remove acne in Photoshop?
The most convenient way to solve the stated problem is to use an interesting tool. This is the Spot Healing Brush. It's next to the Brush tool. By the way, the previously mentioned tool is a more automated prototype of the usual “Healing Brush”.
Another way to remove problem areas of the skin is the “Patch”. The principle of operation of this tool is that it takes a certain area of the image and transfers it to the problem area, merging the edges. This creates a fused image. In order to copy the desired area of skin, you need to hold down the Alt key and click on it with the mouse. In order for the problem area of the skin to ultimately look natural and not retouched, you need to choose the area of the skin that most closely matches the format and texture of the place where the pimple is located. After this, you just need to sketch the pimple using this tool, as if you were doing it with a pencil or a regular brush.
To make it easier to imagine the principle of operation of this wonderful tool and understand how to remove acne in Photoshop, we will give a simple example. Let's say you have a good quality photograph. But, unfortunately, at that moment you had an unpleasant formation in the form of a pimple on your forehead. Using a spot healing brush, you take an area of skin from the forehead that is similar in color and light. You cover up the pimple and it disappears, as if it was never there.
Let's take a closer look at the "Mode" button that accompanies this tool. We click on the triangle and see that a menu appears in front of us. The program prompts us to select a specific mode for applying the effect to the image. In order to understand what you need, you need to experiment and select the desired mode. Another tool attribute is the Source function. It is this command that determines what is painted over, in this case, a pimple. "Smooth" is a tool that differs in that in order to correct a flaw, we will use this tool like a brush. Another setting is "Pattern". This option allows the user to select the area of the image that will be replaced. You must choose between the options "All layers", "Active layer", "Current and next".
The Healing Brush is a tool that works like a regular healing brush. It will help you remove acne faster in Photoshop. The only difference is that the area to cover the pimple is selected automatically. A very convenient tool for a time crisis situation.
But the "Patch" tool is of particular interest to use. In order to realize the potential of the option, it is necessary to select a healthy area of skin and move it to the desired location. If you check the box next to the "Source" function before using the tool, we will move the selected place. Well, if you check the box next to “Destination”, then you will need to subsequently transfer the desired area to it. Also, don't forget about setting the transparency. This determines whether this layer will be transparent when transferred to the image or not.
We hope that the materials in our article will help you get closer to understanding the work of the Photoshop graphics editor. The main thing is practice!
Pimples on the face can ruin a beautiful photo. Everything is perfect, but the red dots on the face stand out from the overall picture. Modern technologies make it possible to eliminate unpleasant defects. To remove acne from a photo, just use Adobe Photoshop, which can turn an ordinary image almost into a work of art.
Available tools
There are four ways to remove pimples in Photoshop. The result will be approximately the same. Choosing the right method depends on skills program. To get a good result, several tools are usually used at once. 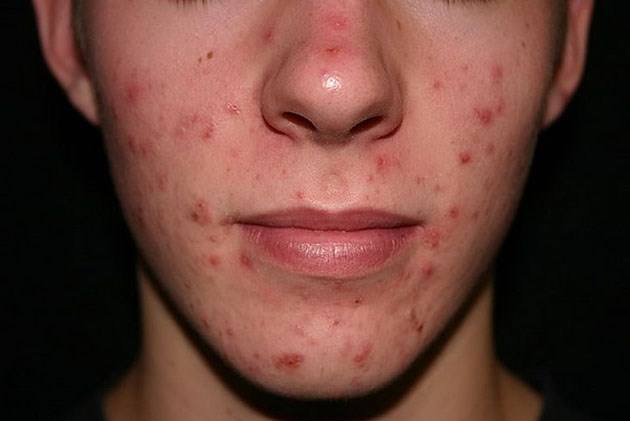
The function allows you to cover up pimples in a couple of clicks. All you have to do is select a tool and press on each pimple. As a result, you will be able to completely clean your face in a couple of minutes.
The beauty of the tool is that everything is done automatically. No need to delve into complex settings. The program itself adapts to the photo. 
This brush has a similar effect to the previous one. The main difference is that need to click on a “clean” area of skin to obtain data for processing. The result will be perfect.
In fact, using this tool is the most convenient way to remove acne on the face. Healthy skin tone superimposed over the damaged one. The result is pleasing to the eye. 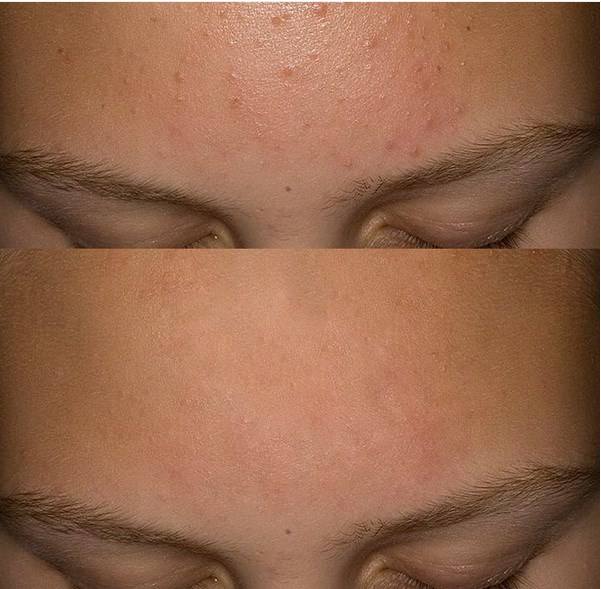
Using the patch you can circle the defective area skin and clean it automatically. In just a couple of clicks you can achieve good results. 
“Strain” works on the “patch” principle. One part of the image is copied and is placed on top of the other. As a result, it turns out to quickly eliminate a variety of defects in the photo.
Enough select a site with defects. Afterwards, click on a healthy area of skin. As a result, you will get a full-fledged photo without acne. 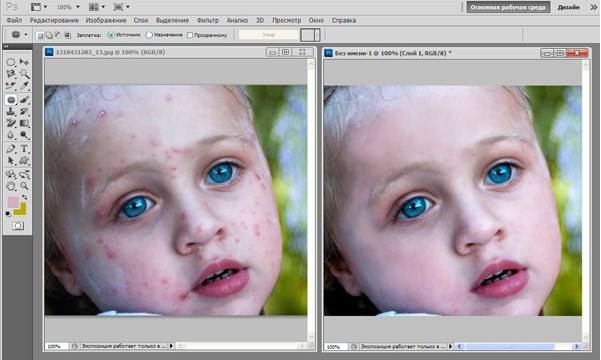
This tool is worth using for creating an effect"perfectly clear skin." The result will be as smooth as possible.
The brush is installed by 15 pixels. This size is enough to “blur” the desired area.
With the button pressed ALT» You need to drive slowly over the damaged area. All defects on the face, including acne, will be covered up in a minute. However, the result will be a little unnatural. 
Eliminating acne in Photoshop
“Photoshop” is a program that allows you to professionally process photographs. Any defects can be corrected using a large arsenal of tools. Removing acne on the face is no exception.
Before you remove acne in Photoshop, you must Add photo for processing into the original project. After this, a new layer is created for ease of work. Enough for this drag image to the corresponding icon. 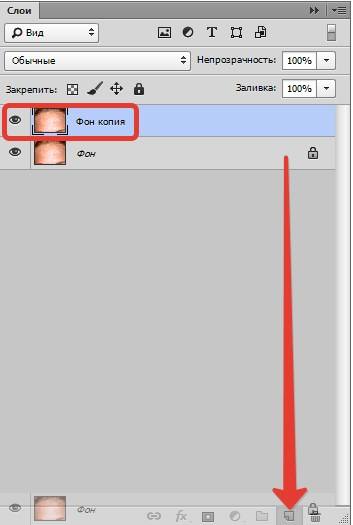
In the left panel, select “ Healing brush" Leave the default settings. Can only be replaced brush size(from 0 to 15). It all depends on the amount of acne. 
Now it's worth click on especially large ones red dots to eliminate them. The process will take about 10 minutes. 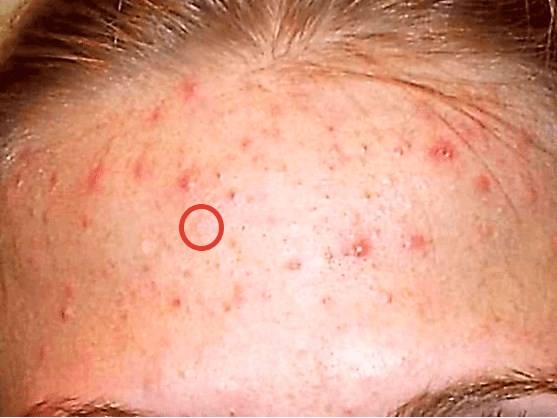
The hardest thing is to get rid of minor defects. In the latest versions of Photoshop, you can use a brush to cover up defects, which significantly speeds up the labor-intensive process. However, you should not completely smooth out all defects, since the skin will turn out unnatural. We will correct the remaining defects in a different way. 
To begin with, you should create two new layers. The main manipulations will be performed on the topmost one. 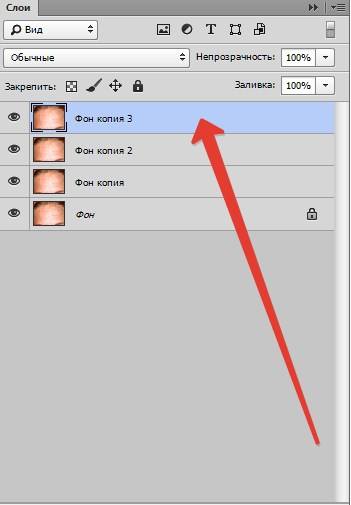
Ideal for post-processing " Mix brush" It is located in the left toolbar. 
You need to set up the brush as in the screenshot below: 
Essentially, it mixes all the tones that fall within the brush's field. Therefore, the size of the tool should be large, but the color should be doesn't matter.
Committing slow rotational movements, you will be able to achieve a good result. The colors will mix and you will get an almost perfect photo. 
Only areas with acne should be covered. There is no need to drag across the entire photo. The result will be too unnatural a shot, which will spoil the perception.
It is worth applying to the above layer surface blur. This function is located in the top menu. 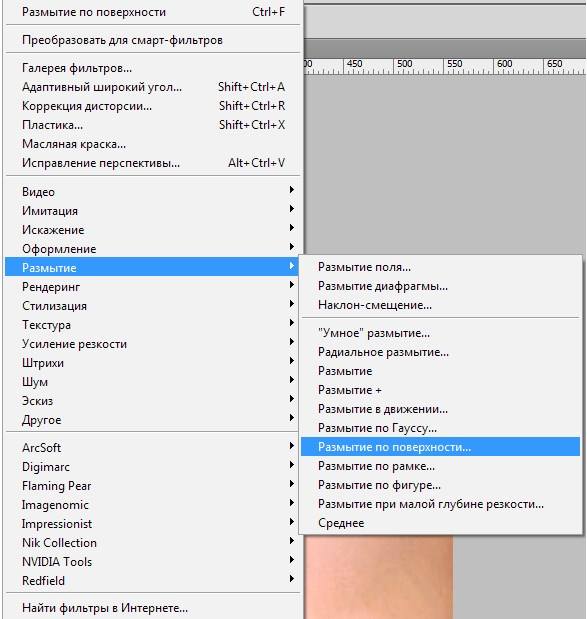
However, everything looks a little unnatural. 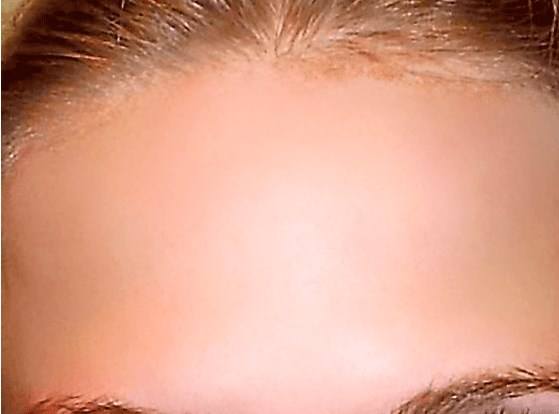
To correct this defect, it is enough to use the previously created additional layer. Take the previously created layer, move it to the very top and create a copy. 
Disable the top copy by clicking the eye icon, and make the bottom copy active. Now you will have to resort to using the “” function, which is also located in the panel located at the top.
Just move the bottom slider and expect large parts to appear. 
We perform the same procedure with the top layer, having first made it visible. We just set the values lower so that small details appear. 
All that remains is to select “ Overlap». 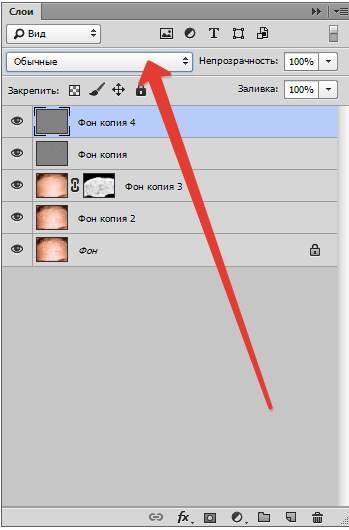
The result will not take long to arrive. 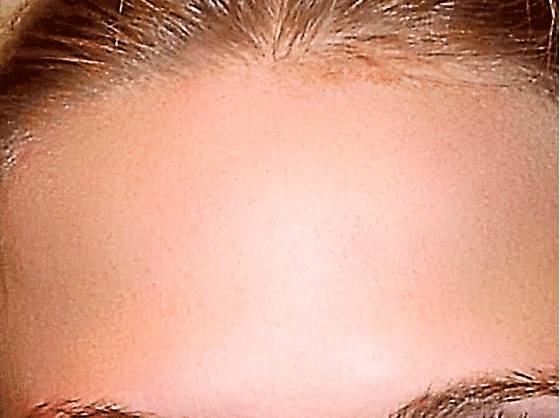
To remove acne on your face in Photoshop, you don’t have to use the formula described above. If you wish, you can experiment with functions and achieve new interesting options. It all depends on your imagination and desire to understand how Photoshop works.